
Retirement Living takes an unbiased approach to our reviews. We may earn money when you click a partner link. Learn More
How to Clean Hearing Aids
Cleaning hearing aids requires a cloth and a soft-bristle brush to remove wax and debris from the shell, microphone, and receiver.
Updated:
At a glance:
- Use a hearing aid cleaning kit with soft-bristle brushes, wax picks, microfiber cloths, and more to clean your hearing aids each day.
- Cleaning your hearing aids involves wiping down the shell, microphone, and receiver with a dry, soft cloth and using a brush to remove wax buildups.
- Behind-the-ear (BTE) hearing aids have tubing and earmolds that can be removed from the body and washed in warm, soapy water.
To keep your hearing aids in the best condition and ensure lasting performance, regular cleaning is essential. Because hearing aids are worn inside the ears, they are exposed to earwax and moisture, which can lead to clogged ports, distorted sound, feedback, and component corrosion.
Below, we provide a step-by-step guide to cleaning your hearing aids at home, along with care tips to help you maintain them.
Tools Needed For Cleaning
In most cases, your devices will come with a hearing aid cleaning kit that includes the tools needed to properly and safely clean your hearing aids. The exact tools may differ depending on the type of hearing aids, but the most common cleaning tools include the following:
- Soft-bristle cleaning brush
- Wax pick or wire loop
- Microfiber/soft cloth
- Disinfectant wipes or spray
- Air blower
- Wax filters
- Multi-tool
8 Steps to Clean Your Hearing Aids at Home
While the exact steps for cleaning your hearing aids will depend on the type and included technology, all styles share these common components.
- The Shell: The outer surface of the device.
- The Microphone: A component that converts sound waves into electrical signals for amplification.
- The Receiver: The hole that directs sound from the speaker to your ear.
Daily cleaning will ensure these components last longer and function properly. It only takes a few minutes and can be done at night before bed or in the morning before use.
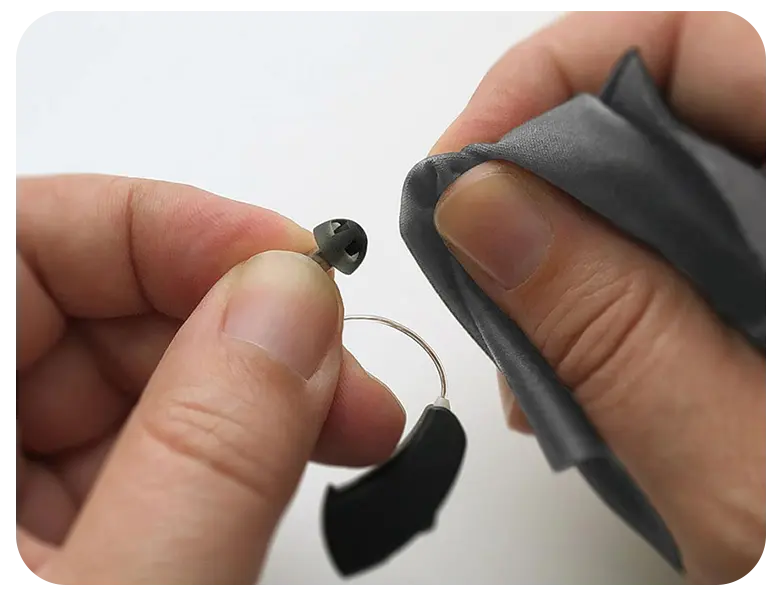
Steps 1–4: Cleaning the Shell
Follow these steps to properly clean the outer casing of your hearing aids.
- Remove your hearing aids.
- Let the hearing aids sit/dry to make cleaning easier.
- Use a dry or slightly damp cloth to wipe off wax and debris.
- Use the soft-bristle brush included in your hearing aid kit to brush away difficult buildups.
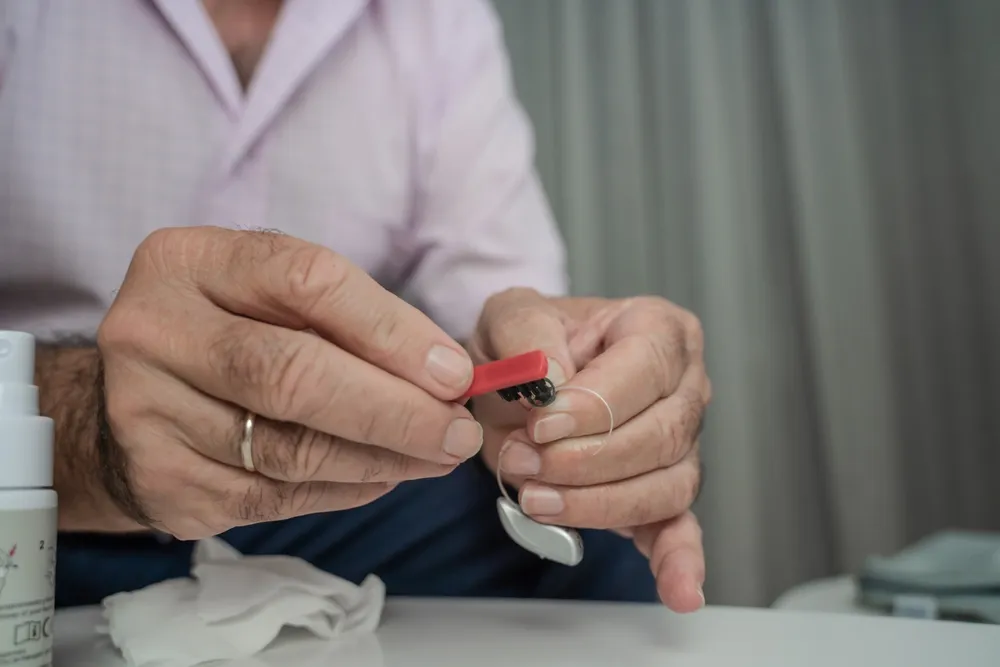
Steps 5–6: Cleaning the Microphone
The microphone is a small component, but it’s one of the most important and delicate parts of your hearing aid, so it’s vital you take extra care when cleaning it.
- Turn the hearing aid upside down (this will help the loose debris fall out, not into it).
- Gently brush across the microphone port.
Do not poke anything into the microphone openings, as this can cause blockage and damage.
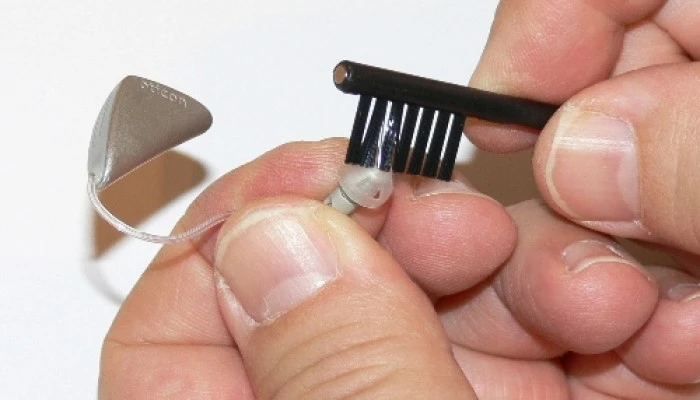
Steps 7–8: Cleaning the Receiver
Finally, follow these steps to clean the receiver.
- Carefully brush wax and debris off the receiver.
- Insert a wax pick or wire loop into the receiver opening (slowly) as far as possible, then scoop out the wax.
Some hearing aids may come with wax guards or wax filters to prevent wax from entering the receiver. In most cases, these are meant to be replaced, not cleaned, but you can maintain them daily by using a cloth or brush. If your hearing aids come with a wax guard, be sure to ask your audiologist for cleaning tips.
Cleaning Different Hearing Aid Styles
Depending on the type of hearing aid, you may have to follow different steps. Make sure you have the proper hearing aid cleaning tools available to achieve a thorough cleaning.
How to Clean BTE Hearing Aids
To clean behind-the-ear hearing aids, follow these five steps:
- Gently wipe and brush debris off the outer surface, microphone, and receiver.
- Carefully remove the earmold from the hook.
- Brush the earmold clean.
- Use a wax pick/wire loop for more stubborn debris.
- Wipe the earmold with a soft cloth.
In some cases, you may need to wash the earmold in warm, soapy water. Let the earmold dry completely before reattaching it to the hearing aid. Never use water to clean the BTE body as it can damage electrical components. Never use chemical cleaners unless they’re specially made for earmolds.
How to Clean ITE Hearing Aids
Cleaning in-the-ear hearing aids is a simple process.
- Use a brush to clean the microphone cover, receiver, and vent openings.
- Use a wax pick to remove stubborn material from the air vent.
- For larger vents, use a thin wire vent cleaner to push and remove blockages from the vent hole.
- Wipe the hearing aid with a microfiber cloth.
How to Clean RIC Hearing Aids
Follow these steps to clean your receiver-in-canal hearing aids.
- Brush the entire hearing aid with the soft-bristle cleaning brush to remove any debris.
- Gently massage the dome tip to push out stubborn deposits.
- Wipe the hearing aid down with a soft cloth.
If the dome becomes worn or misshapen, or if there’s a blockage that can’t be removed, replace it.
For in-the-canal (ITC) hearing aids, which are similar to RIC hearing aids but sit fully in the ear canal, you can follow the same steps. Just be sure to handle carefully, as the components are small and could be damaged by excessive force.
Tips for Cleaning Hearing Aids
Keep these tips in mind when cleaning to ensure proper hearing aid care.
- Always wash your hands before cleaning your hearing aids.
- Turn your hearing aids upside down when cleaning the ports and openings so that loosened debris falls out.
- Avoid household cleaners, rubbing alcohol, hand sanitizers, and wipes when cleaning your hearing aids, as they can corrode sensitive electronics.
- Only use wipes or a sanitizing solution specifically designed for hearing aids.
- Use a bulb blower after washing the tubing to help it dry faster.
- Avoid exposing your hearing aids to too much water, and never submerge them.
- Use a slightly damp cloth for more stubborn wax buildup (keep away from electrical components).
- Open the battery compartment (if using disposable batteries) when storing overnight to allow air circulation and prevent moisture buildup.
- Store hearing aids in a case or charger when not in use to avoid dirt and damage.
- Avoid exposing your hearing aids to extreme temperatures.
- Before swimming, bathing, or using hair sprays or other products, remove your hearing aids and store them properly to protect them.
- Use a dehumidifier overnight to better remove moisture, sweat, and humidity.
- Schedule your cleaning routine for before bed, so your hearing aids have time to dry out and are ready for use the next day.
How Often Should You Clean Hearing Aids?
Hearing aids should be cleaned regularly to prolong their lifespan and guarantee the best sound quality. For the best results, you should follow a daily, weekly, and monthly cleaning schedule.
- Daily: Gently wipe outer surfaces with a dry cloth, use a cleaning brush to remove debris, and check the microphone for obstructions. When not in use, store your hearing aids in a designated charger or protective case to keep them secure and dry.
- Weekly: Deep-clean earmolds or tubing if present, and use a wax pick or wire loop to remove wax buildup or stubborn deposits. Never use the pick near the microphone or receiver ports, as this could push earwax inside and cause damage.
- Monthly: If your hearing aid has wax guards, replace those as needed and inspect your device for signs of wear or damage.
The frequency and level of cleaning depend on the type of hearing aid as well as your environment. Smaller devices that sit deep in your ear may require more regular and deep cleaning. Additionally, if you live in a humid environment, perspire heavily, or produce a lot of earwax, you’ll want to keep your hearing aids as clean and dry as possible.
At-Home vs. Professional Cleaning
Hearing aids typically require both at-home and professional cleaning to ensure lasting performance. Basic hearing aid maintenance and cleaning should be done at home daily. However, cleaning should be performed by a specialist every six months, or as recommended by your hearing care professional.
Professionals have tools, such as vacuums with specialized attachments, that gently remove wax from hard-to-reach places. They can safely clean vents, microphones, and receivers. Specialists also offer deep moisture removal, tubing replacement, and software adjustments.
If you purchased your devices from a hearing aid clinic, they often provide cleanings as part of the package, meaning there’s no additional out-of-pocket costs for regular cleanings. However, if you purchased your hearing aids from an online provider, you may have to pay $30 to $75 for professional cleaning, depending on the hearing aid manufacturer and model.
If you notice muffled sounds or feedback even after cleaning, or if you find wax you cannot safely remove on your own, it may be time to schedule a professional hearing aid cleaning service.
Bottom Line: Regular Cleaning Keeps Hearing Aids Working Longer and Sounding Clear
To keep your hearing aids functioning, ensure quality sound, and extend the lifespan, follow a daily cleaning routine, paying extra attention to more complex areas weekly and monthly. Every six to twelve months, it’s worth scheduling a professional cleaning service.
Cleaning your hearing aids is a simple yet vital process, and by following these steps, you can ensure these tools continue to work properly, benefiting your daily life.
Frequently Asked Questions (FAQs) About Cleaning Hearing Aids
When cleaning hearing aids, audiologists use specialized tools like soft-bristle brushes, wax picks/loops, vent cleaners, and air blowers. They will also often use vacuum-like cleaners to remove debris, safe sanitizing wipes, drying kits (dehumidifiers), and replacement wax filters.
No, using alcohol wipes on hearing aids can destroy the protective coating, damage sensitive plastic casings, and corrode microphones. Instead, you should use a soft cloth, a small brush, or wipes specifically made for hearing aids.
After washing a detached earmold, shake out excess water, use an air blower designed for hearing aids to force water out of the tubing, and let it air-dry overnight before reattaching. Once dry, wipe the earmold down with a soft, dry cloth to ensure the vent is clear.
While not required, a drying case or dehumidifier is highly recommended. These tools help prevent damage, malfunction, and costly repairs caused by moisture. Plus, using them daily removes sweat, humidity, and condensation, extending your hearing aids’ lifespan.
Help us improve our cost data! Email your latest hearing aids quote to [email protected]. Rest assured, your personal details will remain completely confidential.